A short lesson in quick fixes
"We need to fix it quick right now," he said. "The hole is really big and we've lost several hundred fish already."
The fish farmer was panicked. His 20'x20'x6' cage had a large nutria rat hole just at the water line and the fish were pouring out as captive fish will do as soon as they sense an escape route.
"Listen to what I'm going to tell you and don't worry about anything else," I said in as calm of a phone voice as I could muster.
"Get a hold of your cage and pick a spot anywhere on its top bird panel webbing. Just be sure it is several feet away from the edge.
"Now take your knife and cut out a big ole' diamond-shaped piece of netting. Make sure it is at least 6 inches wider than your hole."
The conversation continued as I instructed him to cut the large segment from the top of his pen and, using a handful of hog rings and a pliers, clamp the piece over the hole just like a rubber patch on a flat tire.
Ugly, temporary, and likely not to last more than a few days, but it stopped the fish from getting out until the cage's netting could be repaired. The wedge also has to be resewn into the bird panel.
This type of quick repair is called a gorilla patch. It works on everything from a 85' deep-water shrimp trawl to a 5,000 square foot fish pen.
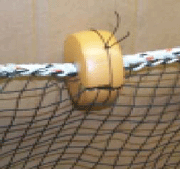 |
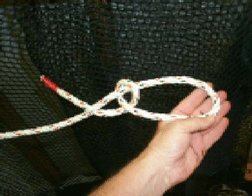
At left, additional floats can be added to a line as a quick fix to flotation troubles, but take time to secure the float's perimeter to prevent it from sliding off. Below, how to tie the quick fix loop-and-tuck knot. |
 |
|
Sometimes there just isn't time for anything but a quick fix. Using the common materials on hand will save the day and get you out of a really nasty situation.
The trick is to recognize what you have and how to work with it.
The tale of the rat hole is as common as a heron eating fingerlings. You'll find a rat hole in any pen you leave in the water long enough. No one says that you need to resew a hole on the spot and no one carries spare webbing in their back pockets. The use of the lighter bird netting from the top of the cage leaves you somewhat vulnerable to bird intrusion but the fish escaping at water level is the most critical situation.
Useful tools
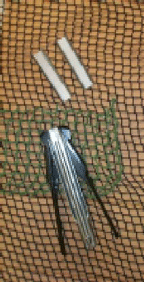
One of the most useful tools I have found is the clip-fed, 50-shot Bostitch hog ring pliers (see lower photo at right). You can clamp your way along a tear or rip on almost any netting device. That fastening is not as strong as hand-sewing and it looks really ugly. However, the bottom line is that it works in a pinch.
The automatic feed and simple hand squeeze let you keep one hand free to hold the tear in place. I strongly suggest using aluminum clamps for this kind of repair. Then, when you do find the time to re-sew your hole the correct way, the aluminum clamps can be snipped right in two. I use a good pair of airplane snips to cut the clamps away. I have also used fence pliers with their large jaws and sharp pincher edge, ideal for cutting through the 1/2" or 11/16" clamps.
The universal "tie wrap" is good for almost everything, including delivering babies. It has been used in every conceivable fisheries program in North America.
There are a few tricks to using the versatile plastic binders that not everyone is aware of. For one, if you are going to use it to hold netting to line or rope of any kind, first open the weave of the line and insert the tie wrap between the weaves. Then encircle the entire line, picking up the netting before the tie is drawn tight. In braided line simply pass it through the weaves. In twisted line, open one of the three strands. Placing the tie wrap within the weave keeps the tie from slipping.
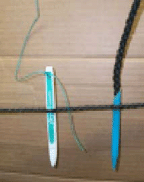 |
At right top, fids poked into the strands of a line.
Right, the hand-operated Bostitch hog ring pliers and clamps. |
 |
If you are going to use tie wraps to seize a large stretch of netting to a line or cable (seine, bird panel, cage wall), first weave/lace a line of nylon thread #15-#36 along the edge of the netting. This allows you to space out the ties out every so many meshes since the nylon line supports several meshes in between the places where you anchor the tie.
Parted line
Splicing rope is always a necessity on a fish farm but splicing that line while trying to hold onto two broken ends connected to a 1,200' seine or an anchor line for a large floating pen can be almost impossible. The best method I have found for a quick fix is the loop-and-tuck knot.
Shown in the photos on the next page, you see something so unbelievably simple it just cannot possibly work. Well, don't let the little knot fool you. Large boats have been towed with it, as have trawling nets generating 4,000-5,000 pounds of pull. The secret to the working of this knot is friction and geometry.
As shown, the line is looped into a half hitch and then instead of tying a permanent knot, the loose tag end is inserted into one of the weaves of the rope. On braided line, the tag end is tucked inside the hollow line twice.
Another quick fix to parted line is to simply overlay a piece of line on top of two broken ends. The repair section can be lashed to the broken line.
Whether using twisted or braided line, it is best to weave your repair twine through the strands of the line. You can use a fid, or substitute a tooth brush handle. The rounded end slides through both braided as well as twisted rope. The already smooth bored hole in the handle can accommodate even a heavy duty thread. The brush end is cut off and, with just a little shaving, makes a smooth point that is ideal for poking through the strands of the rope. Your lashing can then be a series of half hitches around both the broken end as well as the repair piece.
The first catfish seining operation I ever watched was a lesson in itself. As the live car (sock) was attached and the fish were crowded from the seine into the live car, at least 2,000 pounds of fish rushed the backside of the live car and swam over the top line. There were only broken black grommets where there should have been floats. Apparently the floats had been torn or crushed off the net.
A simple reminder, a plastic milk jug or bleach bottle has the support equivalence of five or six of the can-type floats. Their already molded handle makes them ideal for tying onto a bare line in need of buoyancy.
Also, to add buoyancy, a doughnut-shaped sponge type float can split and inserted onto a line (see top photo above right). The problem is that if the float can be pushed onto the line, it can also slide off. The solution is to score the exterior surface of the float with a pocket knife. Make a single groove, 1/8" deep completely around the perimeter of the float.
Next, wrap a piece of electric fence wire around the float and begin to twist it tightly. Slide the wire into the groove and continue twisting the two ends. Tuck the twisted end downward so it doesn't snag the net or stick your hand. The float will now be bound very tightly to the line.
Seine repair
The most common repair on any seine/net in the field is the torn hole. It can be as simple as a few broken meshes or a long diagonal rip. The fastest method of fixing this is to lace it back. Lacing means just that, weave a repair twine in and out catching both sides of the rip. A knot is tied every so many inches or even feet. The general idea is to close the hole until a proper repair can be made.
Most rips wind up looking like a long "y." Normally if you start lacing on one end, you will wind up with a lot of webbing bunched up on the other end when you finish.
To keep the lacing even, it is best to start your lacing from the two farthest corners. Lace a few meshes from each side and slowly work your way towards the center of the rip. This helps reduce the chance of bunching up the netting. It works best if you can lay the webbing flat on the ground, though the repair can be done in the water if you're working on a cage.
There is a quick, unorthodox fix for a fingerling seine that bogs down in a muddy area of a pond. If you find you have a section of pond that has extreme muddying problems, you can slide over this trouble by attaching 50' lengths of garden hose directly to the seine's bottom line. Tie wraps work just fine.
The smooth surface of the hose coupled with the tendency of rubber products to lose 80% of their weight underwater makes the common water hose an ideal mud line for small seines. The hose can be removed at any time and put back into service washing down the green house. Dragging it through the mud does little if any damage .
One final note it is important to remember that these are quick fixes. For the most part they are not recommended to be left in place indefinitely. Put the bandage fix in place, finish the job, and then make permanent repairs. n
Greg Faulkner operates a net shop and can be reached at PO Box 115, Milton, LA 70558, or e-mail: [email protected]